
Just so you don't get rusty, here are some additional notes continuing from the last class on anatomy. Have a go at some of the examples in this blog , they will help you when we draw the gun slinger next week.(31st January).
This is also for Tracey , to help her with drawing faces.
Ok Then, lets draw some heads.
Those of you who were present last term will remember these exercises.
These are to be used as a rough guide for becoming familiar with the positioning of the features of the face.

When drawing the face front on roughly sketch out a rectangular shape and divide it into four (as above)
.The center line is roughly where the eyes will sit.

Next , divide the bottom half into two and then roughly into half again. The lines will roughly map where the nose and mouth will sit.

Divide the width of the head into five equal spaces. The second and forth spaces are where the eyes will sit.

Start to map out the nose and mouth. Decide whether to have a thin nose or a wide nose then draw a line either side of the nose starting from the bridge between the eyes. This will determine the width of the mouth.

Now you can begin to define the features more clearly.


This is only a rough guide to help you become familiar with the human face.
As you already know, he human face comes in all shapes and sizes, - young , old, fat , thin, chiselled, and son on. For each type of face you draw you may have to adjust the grid slightly. Have fun drawing different types of face using the grid. Eventually (after loads of practise) you will no longer need to use the grid and distorting the features to create different characters will become easier.
Another method of drawing the head is by using a sphere and a cube.

Divide the sphere /circle into four. Place the cube in one of the bottom quarters 9depending on which way the head is facing).

Roughly map out the position of the nose and mouth.
You don't have to be too precise, you can either divide the depth of the cube into three or half the depth and half it again..

Sketch in the eyes, nose and mouth.

Define the features.

Here a few lines have been manipulated to change the appearance of the face. The nose is slightly longer and down turned, the skin around the jaw has dropped and there are more prominent lines around the eyes and mouth.
It works just the same for three quarter views. Have fun practising drawing heads using this method.


The naext exercise we draw will be from the waist up,so there will be a lot of focus on the face and hands.
Hands can be a stumbling block of many a budding artist., so here's a rough breakdown of how the hands are easily constructed.
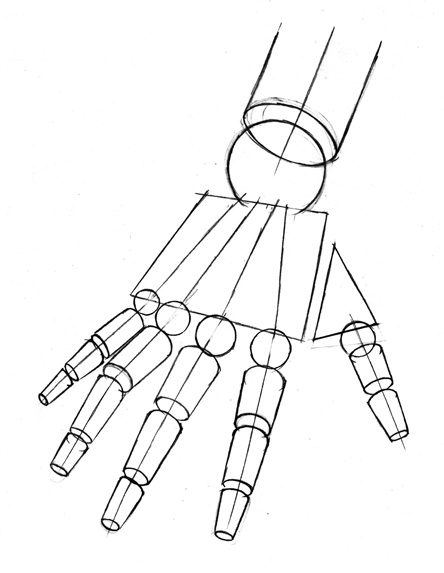
Basically, the hand breaks down into a square for the palm, a triangle for the part of the palm that connects the thumb, circles for the knuckles and three cylinders for each digit.


Using the shapes above , try drawing the hand in different positions.
Also study your own hand and draw it in different positions. Another method would be to take some photos of your hand in different positions and use them as reference.


You have until the 31st to get some practice in. I will be expecting to see some good results .
Have fun!
No comments:
Post a Comment